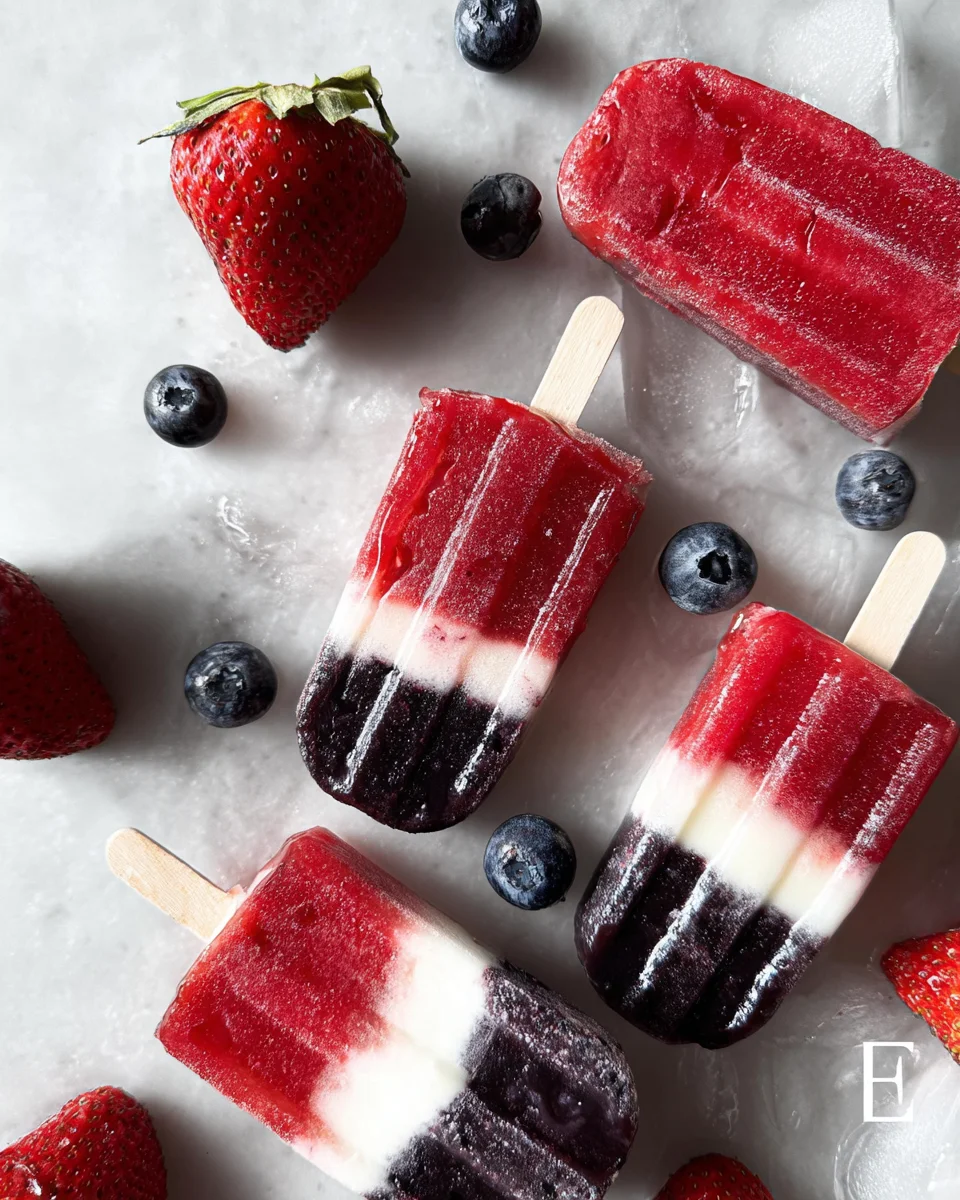
Berry-Coconut Rocket Pops are the perfect summer treat, combining fresh strawberries and blueberries with creamy coconut milk for a deliciously healthy dessert. These vibrant popsicles are not only vegan and gluten-free but also a fun addition to any gathering or family picnic. They capture the essence of summer with their bright colors and refreshing flavors, making them a delightful way to cool down on hot days.
Jump to:
- Why You’ll Love This Recipe
- Tools and Preparation
- Essential Tools and Equipment
- Importance of Each Tool
- Ingredients
- For the Strawberry Layer
- For the Blueberry Layer
- For the Coconut Layer
- Optional Sweetener
- How to Make Berry-Coconut Rocket Pops
- Step 1: Prepare Strawberry Puree
- Step 2: Prepare Blueberry Puree
- Step 3: Mix Coconut Milk
- Step 4: Assemble Strawberry Layer
- Step 5: Add Coconut Milk Layer
- Step 6: Finish with Blueberry Layer
- Step 7: Insert Sticks and Freeze Overnight
- Step 8: Unmold Your Popsicles
- How to Serve Berry-Coconut Rocket Pops
- For a Festive Celebration
- As a Healthy Snack
- For Kids’ Parties
- As a Refreshing Dessert
- How to Perfect Berry-Coconut Rocket Pops
- Best Side Dishes for Berry-Coconut Rocket Pops
- Common Mistakes to Avoid
- Storage & Reheating Instructions
- Refrigerator Storage
- Freezing Berry-Coconut Rocket Pops
- Reheating Berry-Coconut Rocket Pops
- Frequently Asked Questions
- How do I make Berry-Coconut Rocket Pops vegan?
- Can I use other fruits for Berry-Coconut Rocket Pops?
- How long do Berry-Coconut Rocket Pops take to freeze?
- What’s the best way to remove frozen pops from molds?
- Final Thoughts
- 📖 Recipe Card
Why You’ll Love This Recipe
- Easy to Make: With just a few simple steps, you can whip up these popsicles in no time.
- Healthy Ingredients: Made from fresh fruits and coconut milk, these pops are a guilt-free indulgence.
- Vegan and Gluten-Free: Perfect for those with dietary restrictions, everyone can enjoy these tasty treats.
- Customizable Sweetness: Adjust the sweetness to your liking using maple syrup or leave it out entirely.
- Great for All Occasions: Ideal for summer parties, barbecues, or simply as a refreshing snack at home.
Tools and Preparation
Before you dive into making your Berry-Coconut Rocket Pops, gather your tools. Having the right equipment will make the process smooth and enjoyable.
Essential Tools and Equipment
Importance of Each Tool
- Food processor or blender: Essential for pureeing the fruits smoothly, ensuring a nice texture in your popsicles.
- Popsicle molds: These create the fun shape of your rocket pops, allowing for easy freezing and removal.
- Whisk: Ideal for mixing the coconut milk with sweeteners evenly.
Ingredients
For these Berry-Coconut Rocket Pops, you will need:
For the Strawberry Layer
- 1 pound strawberries, trimmed and roughly chopped (you can use fresh or frozen)
For the Blueberry Layer
- 2 cups blueberries (fresh or frozen)
For the Coconut Layer
- 1/4 cup unsweetened coconut water
- 8 ounces canned unsweetened full-fat coconut milk
Optional Sweetener
- Pure maple syrup (optional)
How to Make Berry-Coconut Rocket Pops
Step 1: Prepare Strawberry Puree
Using a food processor or blender, puree the strawberries. Add 1 to 2 tablespoons of coconut water to thin the mixture enough for easy pouring. If desired, sweeten with 1 to 2 teaspoons of maple syrup. Set this mixture aside.
Step 2: Prepare Blueberry Puree
Repeat the same process with the blueberries using additional coconut water as needed to achieve a pourable consistency.
Step 3: Mix Coconut Milk
In a separate bowl, add 1 tablespoon (or more to taste) of maple syrup to the coconut milk and whisk until smooth.
Step 4: Assemble Strawberry Layer
Pour or spoon the strawberry mixture into popsicle molds, filling each about 1/3 full (approximately 2 tablespoons per mold). Place molds in the freezer for about 10 minutes.
Step 5: Add Coconut Milk Layer
After initial freezing, pour or spoon in the coconut milk layer on top of the strawberry layer. Freeze again for another 10 minutes without fully solidifying it.
Step 6: Finish with Blueberry Layer
Add the blueberry puree on top of the coconut layer. You want each layer to hold its shape but not freeze completely yet.
Step 7: Insert Sticks and Freeze Overnight
Once you have added all layers and they have set slightly after each addition, insert popsicle sticks into each mold. Freeze overnight or at least for 8 hours.
Step 8: Unmold Your Popsicles
When ready to enjoy your Berry-Coconut Rocket Pops, dip the molds into warm (not hot) water for about 10-20 seconds. This will help loosen them so they slide out easily.
Enjoy your homemade refreshing treats!
How to Serve Berry-Coconut Rocket Pops
Berry-Coconut Rocket Pops are a delightful treat perfect for hot summer days. Their vibrant colors and refreshing flavors make them an appealing dessert for both kids and adults. Here are some fun serving suggestions to enhance your experience.
For a Festive Celebration
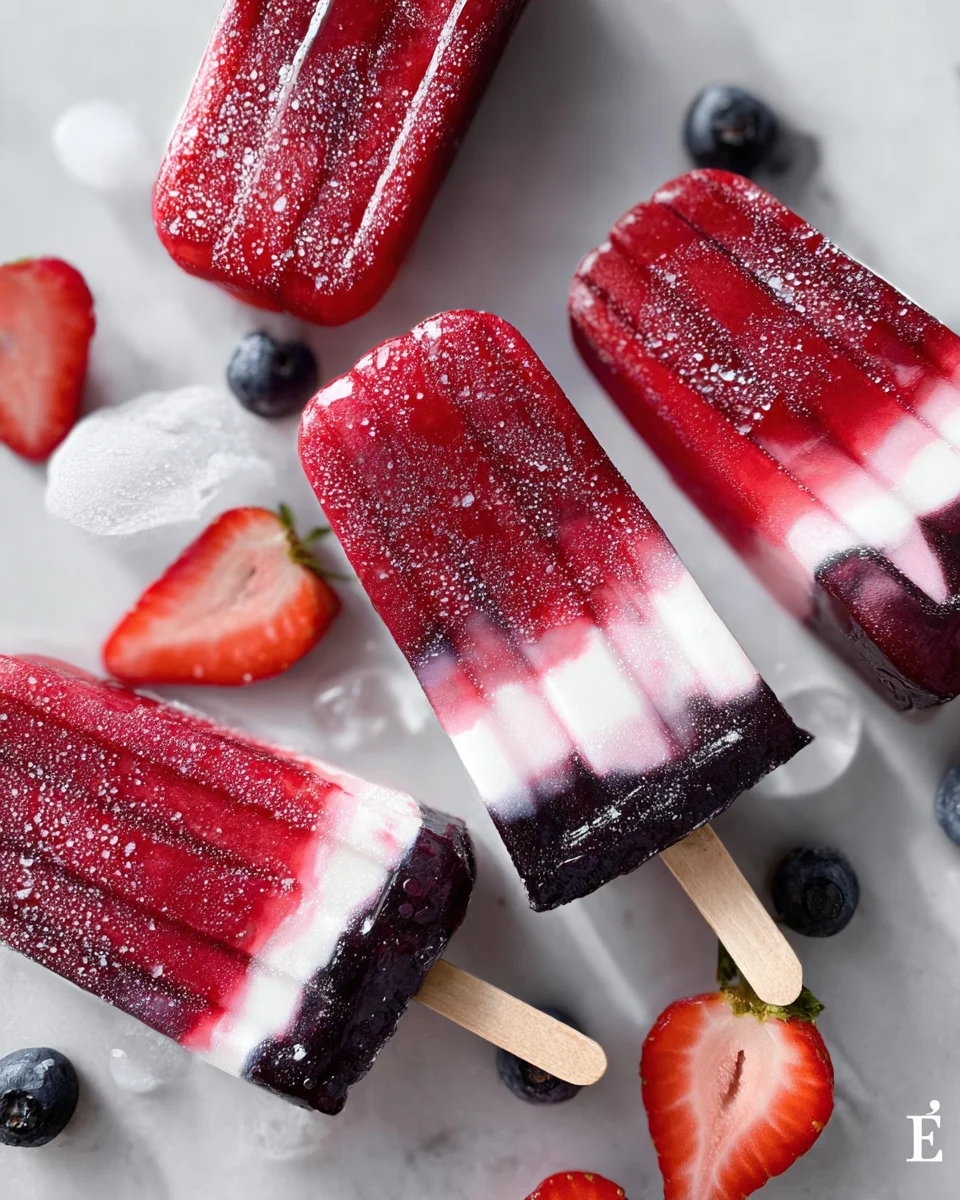
- Serve at BBQs: These pops are a great addition to backyard barbecues, bringing a festive touch with their red, white, and blue layers.
- Add Whipped Coconut Cream: Top each pop with a dollop of whipped coconut cream for an extra creamy treat.
As a Healthy Snack
- Pair with Fresh Fruit: Serve alongside sliced fruits like watermelon or oranges for a colorful and nutritious snack.
- Offer with Granola: Crumble some granola on the side for a crunchy texture that complements the smoothness of the pops.
For Kids’ Parties
- Create a DIY Station: Set up a station where kids can customize their pops with toppings like shredded coconut or small chocolate chips.
- Present in Fun Cups: Use colorful cups or themed holders to make them more exciting for children.
As a Refreshing Dessert
- Garnish with Mint Leaves: Add fresh mint leaves as garnish to elevate the presentation and add freshness to each bite.
- Serve in Tall Glasses: For an elegant touch, serve each pop standing upright in tall glasses filled with ice.
How to Perfect Berry-Coconut Rocket Pops
To ensure you create the best Berry-Coconut Rocket Pops, consider these helpful tips.
- Bold blend strawberries well: Make sure your strawberry puree is smooth to avoid chunks that can disrupt layering.
- Bold freeze layers properly: Freeze each layer just enough so they don’t mix; about 10 minutes is ideal between layers.
- Bold use fresh ingredients: Fresh berries will give better flavor than frozen, enhancing the overall taste of your pops.
- Bold adjust sweetness: Taste each mixture before freezing; adjust sweetness according to your preference using maple syrup.
- Bold experiment with flavors: Feel free to mix in other fruits or flavored extracts to create unique variations of your pops.
Best Side Dishes for Berry-Coconut Rocket Pops
While Berry-Coconut Rocket Pops are delicious on their own, pairing them with complementary side dishes can elevate your dessert experience. Here are some great options:
- Bold Fruit Salad: A refreshing mix of seasonal fruits like melons, berries, and citrus adds brightness and color to your meal.
- Bold Yogurt Parfait: Layer yogurt with granola and fresh fruit for a wholesome dish that balances sweetness with creaminess.
- Bold Nut Butter Toasts: Whole grain toast spread with almond or peanut butter makes a nutritious side that pairs well with fruity flavors.
- Bold Veggie Platter: Crisp vegetables like carrots, cucumbers, and bell peppers provide crunch and contrast against sweet popsicles.
- Bold Cheese Board: A selection of cheeses paired with crackers enhances your dessert table’s variety while keeping it light.
- Bold Smoothie Bowl: A thick smoothie topped with nuts and seeds offers another cold treat that’s equally refreshing on warm days.
- Bold Chia Seed Pudding: This creamy dish made from chia seeds soaked in coconut milk complements the tropical flavors of the pops.
- Bold Mini Muffins: Light muffins made from fruits like banana or blueberry provide a delightful bite-sized option alongside your popsicles.
Common Mistakes to Avoid
Making Berry-Coconut Rocket Pops can be simple, but some common errors can lead to disappointing results. Here are some mistakes to avoid:
- Overfilling the molds: Filling the popsicle molds too much can cause the mixtures to overflow and blend together. Fill each mold only a third of the way to keep layers distinct.
- Skipping sweetener: If you skip adding sweetener to your fruit purees, your pops might taste bland. Taste your mixtures and add maple syrup or another sweetener as needed.
- Using warm ingredients: Make sure all mixtures are chilled before pouring them into the molds. Warm ingredients can disrupt layering and texture.
- Not letting layers freeze enough: Failing to freeze each layer sufficiently before adding the next can lead to mixed colors and flavors. Freeze each layer for at least 10 minutes for the best results.
- Neglecting removal tips: If you don’t use warm water when trying to remove pops from molds, they can break apart. Dip the mold in warm water for easy release.
Storage & Reheating Instructions
Refrigerator Storage
- Store in airtight containers: Store leftover pops in an airtight container in the refrigerator for up to 2 days.
- Keep away from strong odors: To maintain flavor, ensure they are kept away from strong-smelling foods.
Freezing Berry-Coconut Rocket Pops
- Use freezer-safe bags or containers: For long-term storage, place pops in freezer-safe bags or containers.
- Label with date: Always label with the date stored; they stay fresh for up to 2 months in the freezer.
Reheating Berry-Coconut Rocket Pops
- Oven: Not applicable; these pops are best enjoyed frozen.
- Microwave: Avoid microwaving directly; it will melt them.
- Stovetop: Not suitable for reheating; serve as is from the freezer.
Frequently Asked Questions
How do I make Berry-Coconut Rocket Pops vegan?
You can easily make these pops vegan by using coconut milk and fresh fruits, which are naturally plant-based ingredients.
Can I use other fruits for Berry-Coconut Rocket Pops?
Absolutely! Feel free to experiment with other berries like raspberries or even tropical fruits like mango for a different flavor profile.
How long do Berry-Coconut Rocket Pops take to freeze?
These pops typically need about 8 hours or overnight in the freezer to fully set and be ready to enjoy.
What’s the best way to remove frozen pops from molds?
Use a warm water bath technique by dipping the mold in warm water for 10-20 seconds before pulling out your pops. This will prevent breaking.
Final Thoughts
The Berry-Coconut Rocket Pops are delightful summer treats that offer a refreshing burst of flavor while being healthy and easy to make. You can customize these pops with different fruits or natural sweeteners based on your taste preferences. Enjoy this vibrant dessert at any summer gathering or as a fun snack!
Did You Enjoy Making This Recipe? Please rate this recipe with ⭐⭐⭐⭐⭐ or leave a comment.
📖 Recipe Card
Print
Berry-Coconut Rocket Pops
- Total Time: 0 hours
- Yield: Makes about 6 popsicles 1x
Description
Berry-Coconut Rocket Pops are a vibrant and refreshing summer treat that will brighten any hot day. Combining fresh strawberries, blueberries, and creamy coconut milk, these popsicles are not only delicious but also healthy, making them a guilt-free dessert option. Perfect for family picnics or backyard barbecues, these colorful frozen delights are vegan and gluten-free, ensuring everyone can enjoy them. With a customizable sweetness level, you can easily adjust these pops to suit your taste. Dive into this easy recipe and impress your guests with a fun and nutritious treat!
Ingredients
- 1 pound strawberries
- 2 cups blueberries
- 1/4 cup unsweetened coconut water
- 8 ounces canned full-fat coconut milk
- Pure maple syrup (optional)
Instructions
- Prepare strawberry puree by blending strawberries with coconut water until smooth. Sweeten if desired.
- Repeat the process for blueberry puree using additional coconut water as needed.
- In a bowl, mix coconut milk with maple syrup until smooth.
- Layer strawberry puree into popsicle molds and freeze for 10 minutes.
- Add coconut milk layer on top and freeze again for another 10 minutes.
- Finish with blueberry puree and insert sticks; freeze overnight.
- To serve, dip molds in warm water for easy release.
- Prep Time: 30 minutes
- Cook Time: Freezing time (8 hours)
- Category: Dessert
- Method: Freezing
- Cuisine: Vegan
Nutrition
- Serving Size: 1 serving
- Calories: 90
- Sugar: 9g
- Sodium: 5mg
- Fat: 5g
- Saturated Fat: 4g
- Unsaturated Fat: 1g
- Trans Fat: 0g
- Carbohydrates: 13g
- Fiber: 2g
- Protein: 1g
- Cholesterol: 0mg
